 Redline
Summary: Edge
Assign cable IDs in three steps: group the ports, choose their numbering order, then review and apply the proposed IDs. Drawing a connection does not number it.
Open Summary: Edges to begin. In native Help, stage buttons open Summary; on the website they are references. Editing buttons in Help do not change the drawing.
1. Groups: classify ports
Open 1. Groups. A cable group belongs to ports, not the whole device: a switch's Ethernet ports and power connector can use different numbering sequences.
Find port searches port labels. Select a label row, then use its checkboxes to choose the physical connectors to assign. Initially, all connectors with that label are selected; repeated views count as one connector.
Enter a New group name and press Create group, or use an existing group's Add button. Merge tables shows assigned and unassigned ports together when revising groups.
Continue to 2. Ordering. You do not need to group every unused connector before reviewing the order.
2. Ordering: set the installation sequence
Select a port row and drag it, or use its up/down controls. Ctrl+ adds or removes rows; Shift+
 selects a range. Moving selected rows keeps their relative order. This changes the numbering sequence, not drawing positions or existing cable IDs.
Select node selects a device's ports. Select node group selects devices with the same ID key; Select port group selects ports in the same cable group. Move that selection to reorder it.
Each cable is counted once, at the first of its two ports in this sequence, regardless of which endpoint is displayed as Source. Continue with Done with ordering (Continue).
3. Auto Increment: choose the number formats
In 3. Auto Increment, set each group's separator, starting number, and minimum digit count. For example, ETH with separator -, start 1, and three digits produces ETH-001.
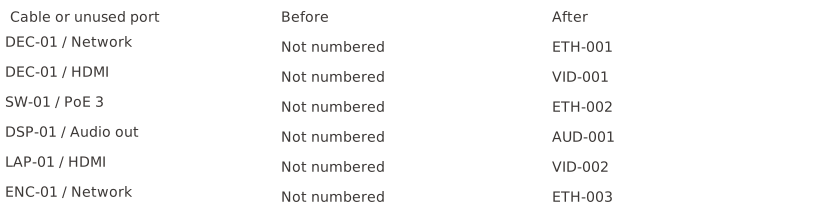
Renumber existing labels is off by default. A label with a nonempty value keeps its entire ID, including its key and separator. Labels with an empty value receive a generated ID; new numbers can use available gaps.
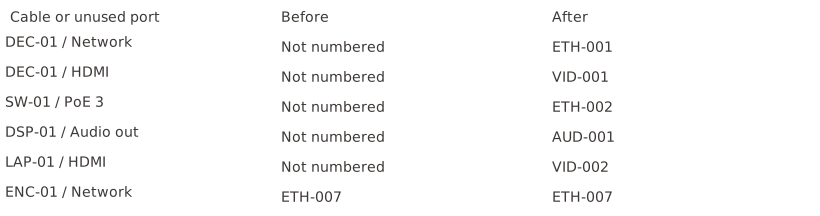
Turning renumbering on replaces the key, separator, and value using the group format and saved sequence. It includes reserved numbers as well as cables; explicitly excluded cables stay out.
If a cable's group is unresolved, choose one for it. Different or unassigned endpoint groups may need this choice. Use an offered group, create one with Create group and use it, or leave the cable out with Leave this edge out of auto increment. This does not change the ports' groups.
Review the previous and proposed IDs
The preview puts Prev Edge ID Key / Value beside Next Edge ID Key / Value, with the endpoints and a connection drawing. Review which cables change and which retain their existing IDs.
Apply, then check the result
Press Apply Auto Increment (Continue) to write the proposed IDs and open Manual. There you can edit Edge ID Key, Separator, and Edge ID Value directly. Leaving without applying keeps the setup edits but does not write the proposed numbers.
Numbering is undoable with Ctrl+Z. Summary: Diff shows changes since the last save; see Summary: Diff.
Optional: linked numbers and reservations
To give two ports' cables the same number, select exactly two ports in Ordering with Ctrl+, then press Link selected ports. They keep their own group keys: VID-001 and AUD-001, for example.
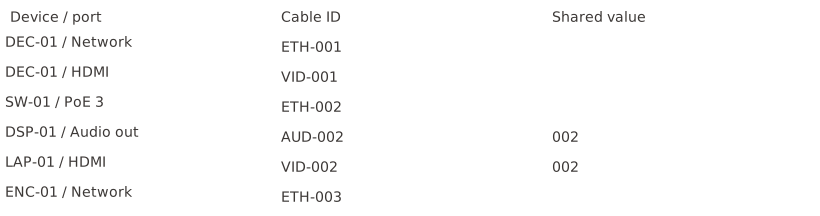
If a selected port has no cable, linking creates a reservation: a cable ID held for that physical connector before a cable is drawn. Auto Increment numbers it alongside connected cables. A new, unnumbered cable uses the reservation automatically when exactly one of its endpoints has one; if several reservations are available, choose Use reservation in Manual.
Select a linked port to see what it shares with. Unlink this port removes its links; a reserved ID can be released separately with Release reservation in Manual.
For label placement, colors, and recorded lengths, see Cable labels and appearance.